Designing and building your dream pool is an exciting journey that involves many steps, from the initial concept to the final touches. If you’re looking for a swimming pool construction in Odessa FL, understanding the process can help you make informed decisions and ensure a smooth experience.
In this article, we’ll walk you through everything you need to know about designing and building your pool, referencing insights from experts and real-life project examples.
1. Conceptualizing Your Dream Pool
The journey to your dream pool begins with a vision. Whether you have a clear idea of what you want or need some inspiration, the first step is to conceptualize the pool that will best suit your lifestyle and preferences. During this phase, you’ll work closely with your pool installer to explore options for shape, size, and features.
As mentioned in the blog “What is a Swimming Pool Installer?” a good swimming pool installer will meet with you at your home to assess your backyard’s layout and discuss your ideas. They’ll guide you through various design options, helping you choose the best layout, materials, and additional features like lighting, water elements, or a spa.
Key Considerations During Conceptualization:
- Purpose: Determine how you plan to use your pool. Is it primarily for relaxation, exercise, entertainment, or a combination of these?
- Design Aesthetics: Consider the overall look and feel you want for your pool area. Do you prefer a modern, sleek design, or something more natural and rustic?
- Budget: Establishing a budget early on helps in making decisions about the size, materials, and additional features of your swimming pool construction.
The conceptualization phase is your opportunity to dream big. Don’t be afraid to explore various styles and features that could make your pool a true extension of your home.
2. The Design and Planning Phase
Once you have a clear concept in mind, the next step is the design and planning phase. This is where your ideas are transformed into detailed plans that will guide the construction process. The blog “Our Swimming Pool Installation Process” emphasizes the importance of thorough planning and communication during this stage.
During this phase, the pool installer will:
- Site Assessment: Measure your backyard and conduct a property survey to determine the best placement for your pool, ensuring it fits well with the existing landscape and infrastructure.
- Design Proposal: Create a detailed design proposal that includes the shape, size, and features of the pool. This proposal will often include 3D renderings, allowing you to visualize how the pool will look once completed.
- Material Selection: Assist you in choosing materials such as pavers, tiles, and the finish (e.g., Pebble Tec) that will give your pool its unique look and feel. It’s important to select materials that are not only aesthetically pleasing but also durable and suitable for the local climate.
- Permit Preparation: Submit the necessary drawings and forms to the county for permitting, which typically takes about 30 days. During this time, you can finalize other details such as landscaping, lighting, and additional outdoor features.
Why Design and Planning Matter:
- Customization: This phase allows you to customize every aspect of your pool, from its shape and size to the type of filtration system and lighting you prefer.
- Avoiding Surprises: A well-thought-out plan helps prevent unexpected issues during construction, ensuring that the project stays on schedule and within budget.
- Integrating with the Environment: Proper planning ensures that your pool integrates seamlessly with your backyard, enhancing both functionality and aesthetics.
3. Navigating the Permit Process
The permit process is a crucial step that ensures your pool is built to code and meets all local regulations. While this step may seem like a hurdle, it’s a necessary one that protects you and your investment. The timeline for permit approval can vary, but as noted in “How Long Does Pool Installation Take?” it typically takes about 30 days to receive approval.
During this waiting period, you and your installer can finalize material choices and prepare for the swimming pool construction phase. It’s also an excellent time to plan any additional landscaping or outdoor living space enhancements that will complement your new pool.
Key Points About the Permit Process:
- Regulatory Compliance: The permit ensures that your pool complies with local building codes and safety regulations, which can include everything from structural integrity to electrical wiring.
- Timeline Considerations: The permit process can be expedited in some cases, but it’s wise to plan for the full 30 days to avoid delays.
- Documentation: Ensure that all necessary documentation is prepared and submitted accurately to prevent any setbacks.
4. Breaking Ground: The Construction Phase
Once the permits are approved, the real work begins. The construction phase is where your backyard starts to transform into the oasis you’ve envisioned. According to the blog “What is a Swimming Pool Installer?” the process typically starts with grading the yard and marking out the pool’s layout.
Here’s a detailed breakdown of the construction steps:
- Grading and Layout:
The first step involves preparing the ground and marking the pool’s outline. This ensures that the pool is built in the right location and at the correct elevation. Grading is particularly important for managing water runoff and ensuring that the pool area remains stable and free from erosion over time. - Excavation:
Next, the pool is dug out according to the design specifications. This phase involves heavy machinery and precise measurements to ensure that the excavation matches the planned dimensions. It’s a critical step that lays the foundation for the entire project. - Rebar Installation:
Steel rebar is installed to reinforce the pool structure. This is a critical step that provides the pool with strength and durability. The rebar is carefully shaped and placed according to engineering specifications, creating a framework that will support the pool’s walls and floor. - First Inspection:
An inspection is conducted to ensure that the rebar and layout meet all safety and construction standards. This inspection is crucial for confirming that the structural elements are correctly installed before the concrete is poured. - Concrete Pouring:
Once the inspection is passed, the concrete is poured, forming the shell of the pool. This step is often done in multiple stages, starting with the floor and then moving on to the walls. The concrete must cure properly to ensure the pool’s long-term durability. - Plumbing and Electrical Work:
Underground plumbing and electrical systems are installed to support the pool’s operation. This includes pipes for water circulation, filtration, and drainage, as well as wiring for lighting, pumps, and any automation systems. Proper installation is essential for the pool’s functionality and safety.
As discussed in the transcript, modern technology has improved this process, allowing inspections to be conducted via video calls, which speeds up the timeline significantly. This innovation can reduce the overall construction time and minimize delays due to weather or scheduling conflicts.
5. The Finishing Touches
After the pool structure is complete, the final touches are added to bring your vision to life. The blog “Our Swimming Pool Installation Process” outlines these crucial finishing steps:
- Tile and Edging Installation:
The pool’s edges are lined with tiles, and any additional features like waterfalls or decorative stonework are installed. The choice of tile and edging materials can significantly influence the pool’s aesthetic, making this an important decision in the finishing phase. - Deck or Pavers Installation:
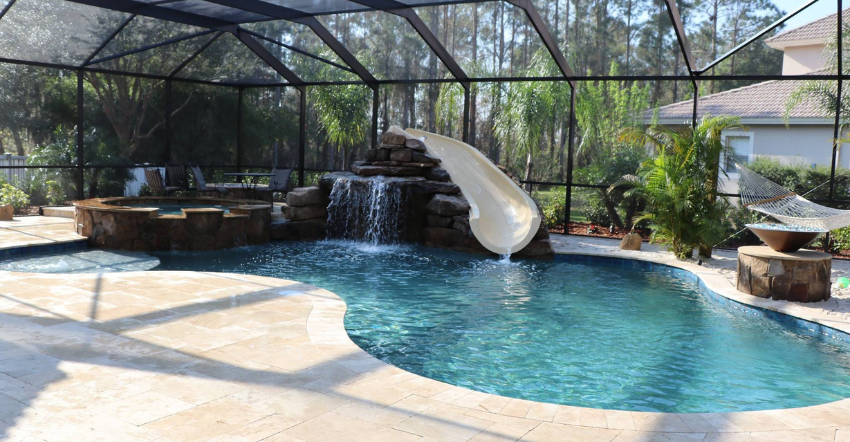
The surrounding pool deck or pavers are laid, providing a seamless transition from the pool to the rest of your backyard. This area can be designed for lounging, dining, or as a space for outdoor activities, depending on your needs. - Screen Enclosures:
If your design includes a screen enclosure, it’s installed at this stage to protect the pool area from debris and pests. Screen enclosures are particularly popular in Florida, where they help keep the pool clean and reduce maintenance. - Pebble Tec Finish:
The final surface is applied to the pool interior, providing a smooth, durable, and aesthetically pleasing finish. Pebble Tec is a popular choice due to its variety of colors and textures, as well as its longevity and resistance to staining.
Additional Considerations for Finishing Touches:
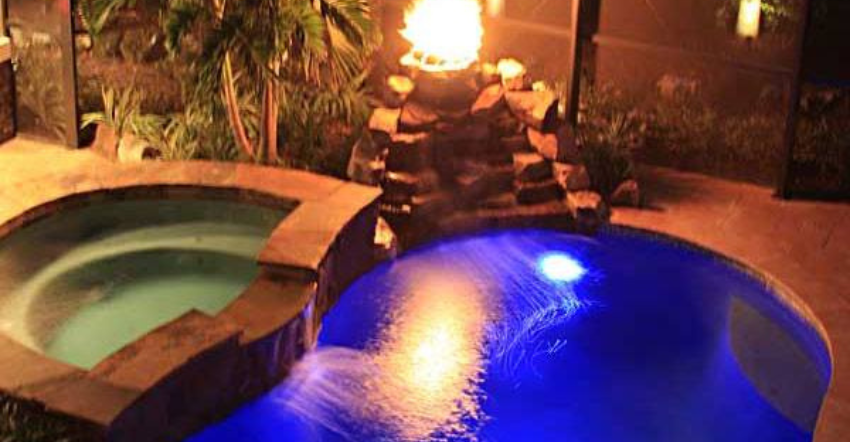
- Water Features: Consider adding waterfalls, fountains, or jets to enhance the pool’s ambiance and create a more dynamic environment.
- Lighting: Pool lighting isn’t just functional; it’s also a key design element. LED lights can be installed to illuminate the pool and surrounding areas, creating a beautiful nighttime setting.
- Landscaping: Integrating the pool with your landscaping can enhance the overall look and feel of your backyard. Choose plants that thrive in your local climate and complement the pool’s design.
6. Final Inspections and Pool Filling
Before you can dive into your new pool, a final inspection is required to ensure everything has been built according to plan and safety standards. This step is crucial for verifying that all systems are functioning correctly and that the pool is safe for use.
- Final Inspection:
An inspector will check the structural integrity, electrical systems, plumbing, and safety features. This inspection ensures the pool complies with all local building codes and regulations. - Pool Filling:
Once passed, your pool is filled with water, and the necessary pool equipment, such as pumps and filters, is installed. This process may take several hours to a few days, depending on the size of the pool. - Balancing the Water:
After the pool is filled, it’s essential to balance the water’s chemistry. This involves adjusting the pH, chlorine levels, and other chemical balances to ensure the water is safe and comfortable for swimming.
As mentioned in the blog “How Long Does Pool Installation Take?” the entire process from breaking ground to filling the pool typically takes about 10-12 weeks, depending on the complexity of the design and the efficiency of the construction process.
7. Post-Construction Maintenance and Care
Even after your pool is complete, maintaining it properly is essential to ensure it remains a beautiful and functional part of your home. This involves regular cleaning, monitoring water chemistry, and maintaining the pool equipment.
- Weekly Maintenance:
Regularly skim the surface for debris, vacuum the pool floor, and brush the walls to prevent algae buildup. Check the water chemistry at least once a week to maintain the correct balance. - Equipment Checks:
Ensure that your pool’s filtration system, pumps, and heaters (if installed) are functioning correctly. Regular maintenance of these systems can prevent costly repairs down the line. - Seasonal Care:
Depending on your location, your pool may require different care throughout the year. In warmer climates like Florida, it’s important to monitor water levels and chemistry closely during the rainy season to prevent issues.
8. Enjoying Your New Pool
With the construction complete and maintenance routines in place, it’s time to enjoy your new pool! This is the moment you’ve been waiting for, where your backyard is transformed into a personal oasis. Whether you’re planning a pool party, a family gathering, or simply relaxing by the water, your new pool is ready to provide years of enjoyment.
Additional Ways to Enhance Your Pool Experience:
- Poolside Furniture: Invest in comfortable loungers, tables, and umbrellas to create a welcoming outdoor space.
- Outdoor Kitchen: Consider adding an outdoor kitchen or barbecue area near the pool for easy entertaining.
- Smart Pool Technology: Explore smart pool devices that allow you to control lights, pumps, and temperature from your smartphone.
If you’re considering a pool project, whether it’s a swimming pool remodeling in Odessa FL, or starting a new swimming pool construction in Odessa FL, Grand Vista Pools is here to help. Our team is dedicated to making your dream pool a reality, guiding you through each step of the process with clear communication and expert craftsmanship.
Building your dream pool is a significant investment, but with the right planning and expert guidance, it can be a seamless and rewarding experience. From the initial concept to the final dive, understanding each phase of the project ensures that your pool will be a source of enjoyment for years to come.
At Grand Vista Pools, we pride ourselves on delivering quality and satisfaction, turning your backyard dreams into reality. Contact us today to start your journey towards a beautiful new pool.